For those of you that follow me on Instagram or Facebook, you will have heard about this, my very first original pattern. It is a goal that I’ve been working towards for quite a while.
How this particular pattern originated…my mom & dad (aka my aunt and uncle), live in the high desert of northern Nevada. Winters can be a bit chilly for them, especially for Dad who levelled 80 earlier this year.
A couple of years ago, before my soul sister Robyn retired and became an author, I made for her a half dozen simple hand/wrist warmers and a few scarves. Her desk was positioned so that the air conditioning vent blew straight at the back of her neck and onto her hands. As a typist, it was pretty uncomfortable. The wrist warmers worked a treat and were shared with the other ladies in the office.
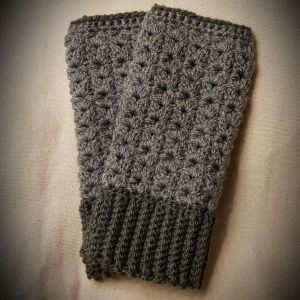
Because they worked so well for Robyn and her colleagues, I decided to make a few for mom and dad. I wanted my aunt to have sets that looked a bit more feminine so I started experimenting with stitches. These were the sets I made for her and dad. For the grey, I followed a pattern created by Yolanda Soto Lopez. This was the same pattern I followed when I made Robyn’s wrist warmers.
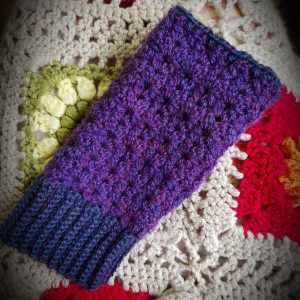
The purple I made using a stitch from The Complete Book of Crochet Stitch Designs by Linda P Schapper.
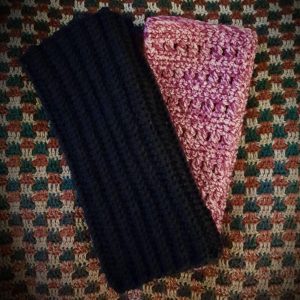
For the next set of his and her half mitts, I changed the treble crochet used in the grey to half treble crochet in the navy. The magenta was completely invented and is a combination of half treble crochet and treble crochet clusters.
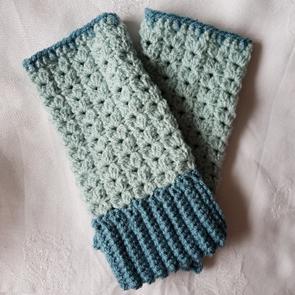
Then a post by Esther of Happy in Red popped up in my Instagram…she had written a free pattern for Bobble Stitch Wrist Warmers and it got me thinking about using granny style stitches, contrasting stitches and trims. After many false starts and many hours later, this was born:
Robyn loved it and she thought it a great idea to write and release a pattern. We collaborated on a name…I wanted something that would allow the maker to imagine a ton of possibilities – Fizzy HalfMitt seems to fit that brief.
This is such a versatile pattern as I hope I’ve shown in the pictures. You can keep it simple and go all one colour, or go wild and do several colours. Very easy to scale to your size and taste. Relatively quick to work up, easy to memorise, this makes for a great stocking stuffer or Christmas gift. And they’re awfully addictive to make as well! I’ve got another 3 pairs in my queue…2 are gifts and one is for me. I shall be posting those on Instagram when they are done.
The pattern in this post is written in UK terms with (USA) terms in brackets. If you’d like the PDF in UK or USA terms, they are available on my Ravelry store for £1.50 free of charge. Purchasing Downloading the pattern there will give you individual PDFs in UK and USA terms in expanded and abbreviated versions. The expanded is the same as the version here on my blog – the abbreviated has most of the tips and quite a few of the pictures stripped out – a bit easier on the printer ink if you don’t need a whole lot of guidance.
*Edited 01 August 2019
One: Fizzy HalfMit.v1
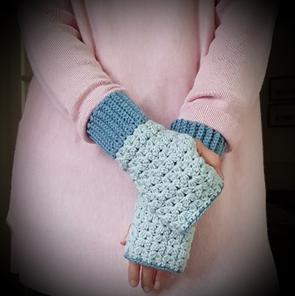
Skill Level: Easy
Stylecraft Special DK: 100% Premium Acrylic – 100g
Color A: Storm Blue
Colour B: Duck Egg
Yarn Substitutes: https://yarnsub.com/yarns/stylecraft/special_double_knit
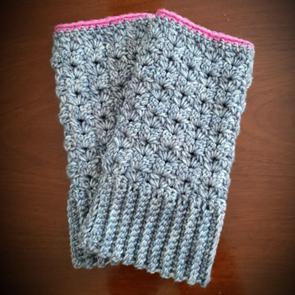
Scheepjes Merino Soft Brush & Soft: 50% Superwash Merino Wool, 25% Micro, 25% Acrylic – 50g (I bought 2 skeins and used 71g for the body)
Body: 252 Toorop –
Trim: 635 Matisse
Yarns Substitutes: https://yarnsub.com/yarns/scheepjes/merino_soft_brush
Stockists:
https://www.stylecraft-yarns.co.uk/Stockists/0_CAFA106.htm
https://www.scheepjes.com/en/shops/
Tools
3.75mm Hook (F hook)
Yarn needle
Stitch marker
Rule or measuring tape
Fabric clips (optional, but does help with sewing the gloves)
Tip: Use the hook size best for your tension and the yarn you’re using. If you crochet loose, you may want to drop down a hook size. If you crochet tight, you may want to go up a hook size.
Stitches – UK (USA)
Chain
dc =Double Crochet (sc = Single Crochet)
BLO = back loop only
Special Stitches
Spike Stitch
Stacked Stitch Treble (Double) Cluster
Treble (Double) Crochet Cluster
Stitch Tutorials
Stacked Stitch Treble (Double) Cluster
Insert hook into the stitch below. Pull yarn loop through. 2 loops on hook.
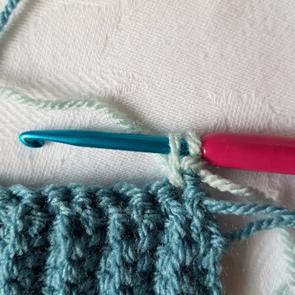
Yarn over, pull through both loops. One loop on the hook. You now have what should look like a dc (sc) stitch hook.
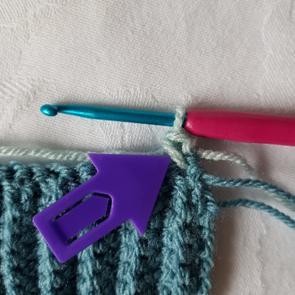
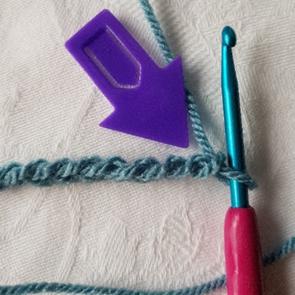
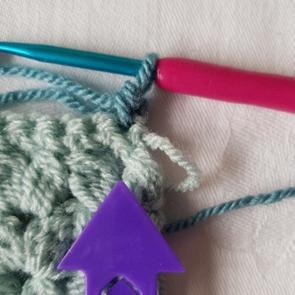
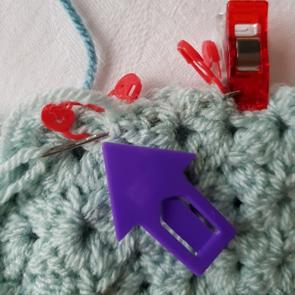
Insert your hook into the bottom loop only of the dc (sc) stitch (see purple arrow), yarn over and pull through. 2 loops on hook. This is the stacked part of the stitch done.
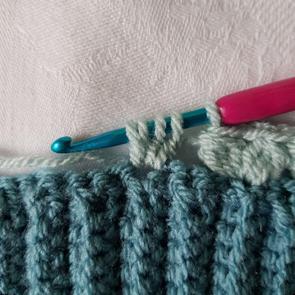
Yarn over, insert hook into the same stitch below, pull loop through. 4 loops on hook.
Yarn over, pull through 2 loops. 3 loops on hook.
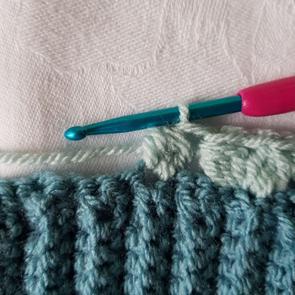
Yarn over, pull through all 3 loops. Cluster done.
Treble (Double) Cluster
Yarn over, insert hook into the stitch below, pull loop through – 3 loops on hook.
Yarn over pull loop through 2 loops. 2 loops on hook.
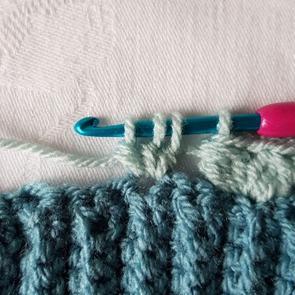
Yarn over, insert hook into same stitch below, pull loop through – 4 loops on the hook.
Yarn over, pull through 2 loops. 3 loops on the hook.
Yarn over, insert hook into the same stitch as the first two times, yarn over pull through – 5 loops on the hook.
Yarn over, pull through 2 loops. 4 loops on hook.
Yarn over, pull through all 4 loops. Cluster done.
A Treble (Double) Cluster V-Stitch is two cluster stitches separated by a ch1 worked into the same stitch. After the first row, all v-stitches are worked into the space between clusters created by the ch1.
My ch3 at the start of rows always appeared a bit emaciated, even when I made them shorter. They also left holes along the edges of work creating wavy rather than straight edges. Felted Button’s stacked stitch method resolves this issue nicely. The stacked stitch is lovely and plump, standing straight compared to my usual ch 2 or 3. Felted Button’s tutorial for the Stacked Stitch can be found in her Trio Blanket pattern on her blog >>> feltedbutton.com/2018/01/trio-blanket-free-crochet-pattern.html
For this pattern, instead of the chain 2, I adapted the stacked stitch method for each starting row cluster. You’ll also notice that I use one rather than two treble (double) crochet with the stacked stitch. This is because with my tension, the stacked stitch is nearly as wide as the two treble (double) crochet that would be worked with the chain 2 to make the cluster. If with your tension you find the beginning clusters look a little skinny, do the stacked stitch with two treble (double) crochet instead of one.
Tip: As you work through the project, pause every now and again to check your tension by measuring your work. I’ve been crocheting a while now, and still struggle with maintaining consistent tension throughout a project. ‘Frog’ should be my middle name!
Before you start…
Measure the circumference of the hand. To do this, wrap a tape measure around the width of your hand over the knuckles. You’ll be working the width of the glove to this measurement.
The glove is worked starting with the cuff. The cuff pattern is worked in row multiples of 4 + 1.
Note:There is no set row count for the body of the gloves or chains for the cuff height. With my tension, the cuff measured a little over 2” (5.5cm) high in Scheepjes Merino Soft Brush and just under 2 ½“ (5.8cm) high in Stylecraft Special DK.
Pattern
Cuff
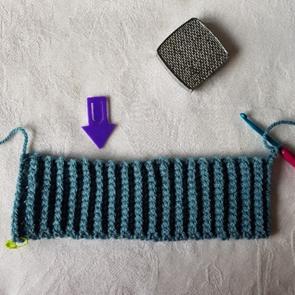
With Colour A, chain desired number of stitches +1. I chained 13. Row 1: work a dc (sc) into blo of the second chain from the hook. Dc (sc) into blo of each chain along taking care not to twist the chain as you work the stitches. Ch 1. Do not turn your work yet.
Tip: working the dc (sc) in the back loop of each stitch gives a neat and easy edge to follow when sewing up later.
Insert a stitch marker at the beginning of the row you just crocheted. This indicates the right side of your work. You’ll refer to the marker for the final cluster stitch row of the body and when you sew the glove.
The number of stitches should match what you chained minus 1. I.e., if you chained 13, you should have 12 stitches. Turn your work.
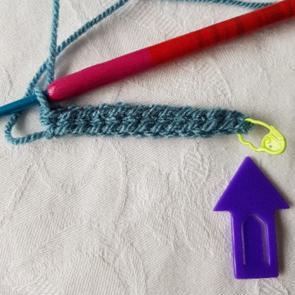
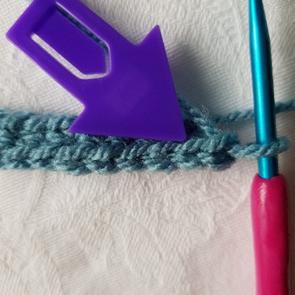
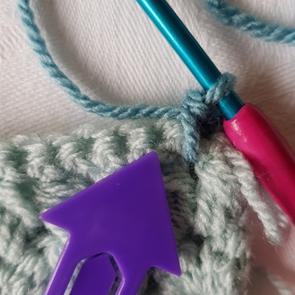
Row 2: Starting with the first stitch next to your chain 1, dc (sc) into blo of each stitch along (purple arrow points at the back loop). Chain 1, turn. You should have the same number of stitches as in Row 1.
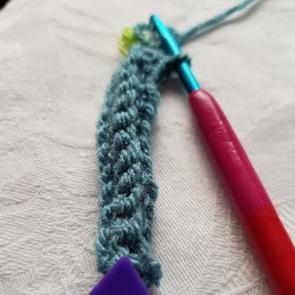
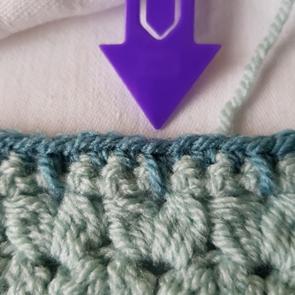
Can you see the ridge running along the centre of the 2 rows?
Repeat row 2 in multiples of 4 until desired width.
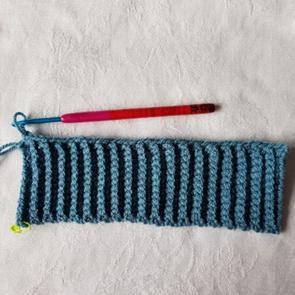
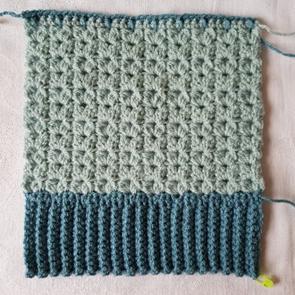
Once you’re close to your desired width with the multiples of 4 rows, work one more row. The number of rows you crochet will depend on your tension, the yarn you’re working with and the hand measurement you’re working to. With the Scheepjes Merino Soft Brush, I crocheted 41 rows. With the Stylecraft Special DK, I crocheted 37 rows.
Ch 2. Do not turn the work. Make note of the number of rows you crocheted. You’ll need this later to check against the number of stitches in the foundation row in the next step.
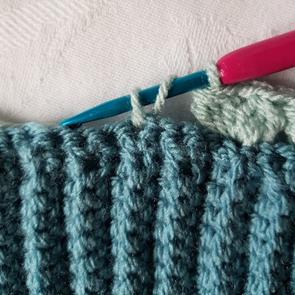
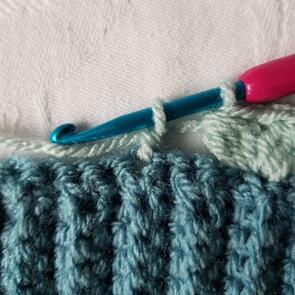
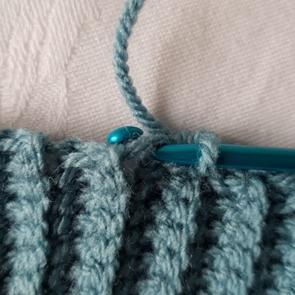
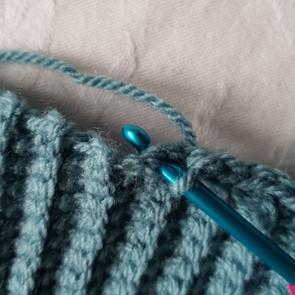
Hold the work so your rows are vertical. Work a dc (sc) foundation row along the edges of the rows.
Tip: The foundation row creates a lovely straight edge making it easier to work the cluster v-stitches for the body of the glove. The cluster v- stitches are quite bulky. Working them directly into the row ends is not only hard work, it doesn’t give as nice a finish.
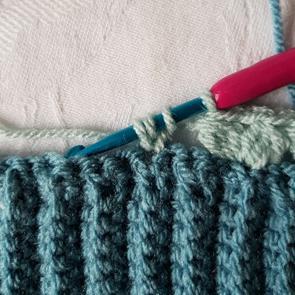
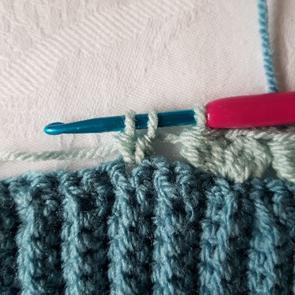
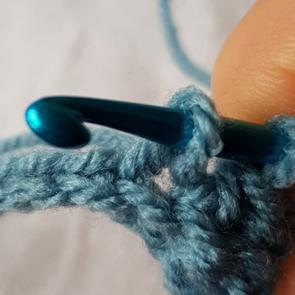
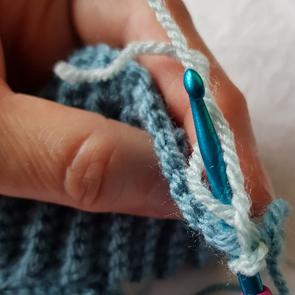
Work one dc (sc) into each row edge stitch, taking care to work under 2 yarn strands.
Tip: Working under only one strand can result in large holes under the foundation row. Be sure to keep your stitches relaxed as this will make working your first row of cluster stitches easier and help retain the elasticity of the cuff.
After you’ve worked your foundation dc (sc) row, count your stitches. The number of stitches should be equal to the number of rows. EDIT 19_11_18: Cut yarn leaving a long tail for sewing and weaving in later. Fasten off. If you are not changing colour, leave enough of a tail to weave in later.
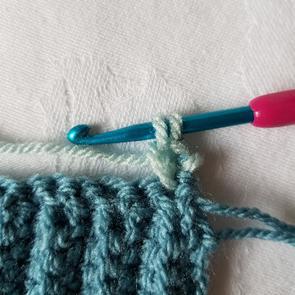
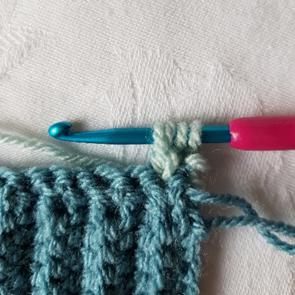
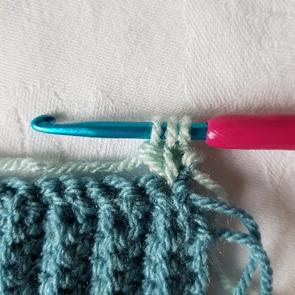
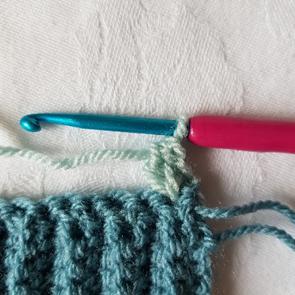
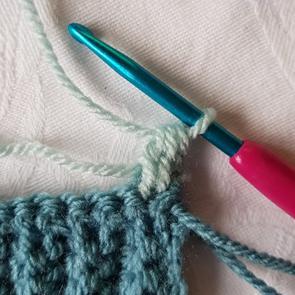
EDIT 19_11_18:Colour Change: Pull through loop of colour B through colour A’s loop on your hook. Make sure you leave a decent length of tail when pulling through colour B. Give colour A a tug to tighten the loop around colour B. Return to colour B, ch1 and turn. DO NOT CUT COLOUR A.
If you’re working the glove in the same yarn, ch 1, turn.
Body
Each row starts with a Stacked Stitch Treble (Double) V- Stitch Cluster and ends with a Treble (Double) V- Stitch Cluster. The stitches are referred to as ‘stacked stitch cluster’ and ‘cluster stitch’. Instructions for the cluster stitches are at the start of the pattern.
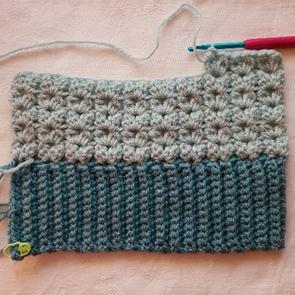
EDIT 19_11_18: Turn over the cuff so that it is right side facing. Your stitch marker will indicate the right side. Pull loop of yarn through the first stitch of the foundation dc row. Chain one.
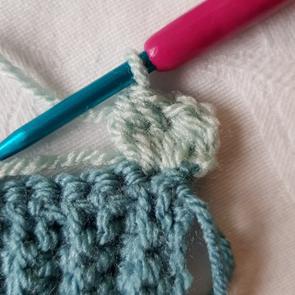
Row 1: With colour B, work a stacked stitch cluster over the tail of colour B and into the first stitch of the foundation row. Ch 1. Work a cluster stitch over the tail of the yarn again, into the same foundation stitch as the stacked stitch cluster you just made. This is your first V stitch. The rest of the tail will be woven in later.
Tip: Working the first cluster v-stitch over the tail of your new colour saves a bit of weaving in later. If you find this too fiddly, work the stitch as normal and weave in later. If you’re struggling to create the first stitch because the loop is too unstable, tie the new colour to the long tail of the old colour.
*Skip next 3 stitches, work a cluster stitch into the 4th stitch. Ch 1, work another cluster stitch into the same stitch.* Second V made.
Work *-* until you reach the end of the row. The arrow indicates the placement of the last cluster in the row. Chain 1, turn.
Row 2: Work a stacked stitch cluster into the space created by the ch-1 in the v-stitch below. Ch 1. Work a cluster stitch into the same ch-1 space. First cluster V stitch made. Work a cluster V stitch into each ch1 space along. Ch1, turn.
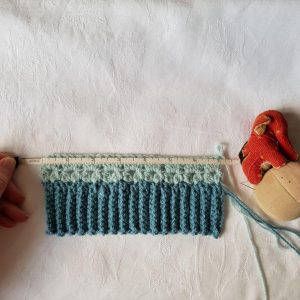
Measure the width of your work between the start and end of row 2. If it is more than 1/2″ narrower or is wider than your hand circumference, frog back to the last row of the cuff and add or remove 4 rows per 1/2″ your work was out compared to the measurement. 4 rows = 1 cluster stitch. There will be some stretch in the finished work so if it is too wide to start with, as the glove is worn, it will stretch and over time, become too big.
Once you are satisfied your work is the correct width, if you are doing a contrasting cuff, cut colour A leaving a 7”-8” tail for sewing and weaving in later.
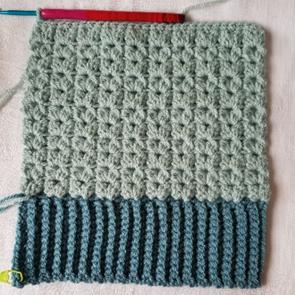
Repeat row 2 until you reach ¼” from the desired length – unless you are not using a contrast colour. Make sure the final row of v-stitches is on the right facing side. Refer to your stitch marker position at the start of the first row of the cuff.
Ch 1, turn.
To finish body, dc (sc) into each stitch in the previous row. The work should now be wrong side facing.
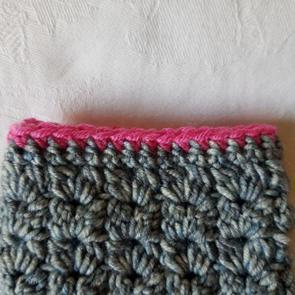
If you want a contrasting trim, cut your yarn leaving a long tail, (about double the height of the body of the glove) for sewing and weaving in later. Do not fasten off.
If you don’t want the edge trimmed in a contrasting colour, dc (sc) crochet one more row, fasten off and cut yarn leaving a long tail, about double the height of the glove, for sewing up the glove and weaving in. The two rows of dc (sc) make for a lovely neat finish.
Do not move on to sewing up step until you’ve completed the second glove. You’ll be checking the size of your second glove against the first – this is best done laying the fabric out flat, before the gloves are sewn. If this is your second glove, move on to Sewing.
Contrasting Trim
Tip: Do not crochet over the tail of the new colour this time. Crocheting over the tail elevates the stitches. Because dc is such a short stitch, crocheted over tails are far more obvious. You wind up with a section of stitches sitting higher than the rest in the row on either side of the crocheted over tail.
Pull through loop of colour A through loop of colour B. Secure colour B. Ch 1, turn. Your work should now be right side facing.
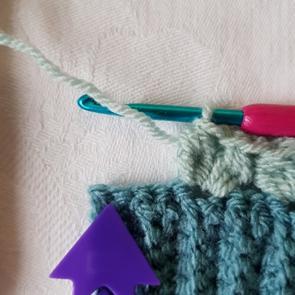
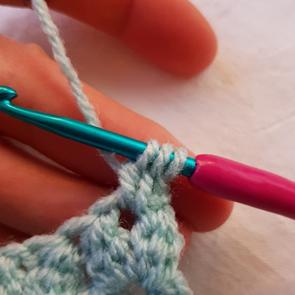
Work a dc (sc) into the first stitch. Dc (sc) into the 1 chain space in the v-stitch under the dc (sc) row you’re working into. The result is a spike that sits between and above the two dc (sc) in the row above the cluster v-stitch.
*Dc (sc) into the next 3 dc (sc) stitches. Dc (sc) into the 1 chain space in the v-stitch under the dc (sc) row you’re working into.* Repeat *-*. Dc (sc) in last stitch in the row. Fasten off and leave enough of a tail for sewing the top of the glove seam and weaving in.
If you want a contrasting trim without the spike, just dc (sc) into each dc (sc) stitch in the row below. Fasten off leaving enough of a tail for sewing and weaving in.
Do not move on to sewing until you’ve completed the second glove. You’ll be checking the size of your second glove against the first – this is best done laying the fabric out flat, before the gloves are sewn. If this is your second glove, move on to Sewing.
Sewing
This bit can be a little bit fiddly and this is where fabric clips can be useful.
Crucial Tip: Check your alignment regularly – most definitely before you do the strengthening stitches as these can be tricky to undo. The cuff seams at the bottom and top edges should align perfectly. A minor misalignment can be fudged a bit by using a loop on the short side more than once when sewing through loops on the opposite longer side. If the misalignment is greater than one or two stitches, it would be better to undo the seam and try again.
Tip: Whatever method you use, be sure to double or triple stitch through stress points at the seams. These are at the top, bottom and on either side of the thumb opening.
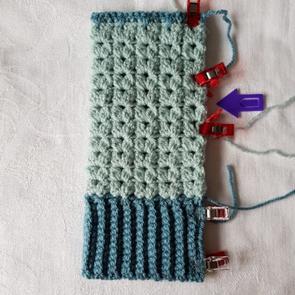
Fold the work in half, wrong side out, and align the edges. Using fabric clips, secure the top and side edges. Mark the top and bottom of the thumb opening with stitch markers on both sides of the work. Place fabric clips next to the stitch markers.
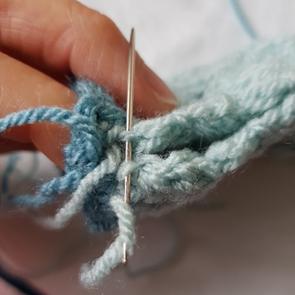
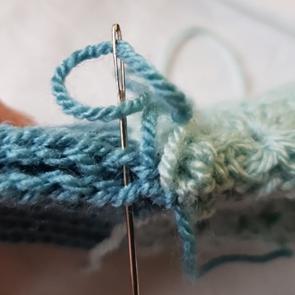
Starting with the trim at the top: use the tail from the trim to sew through the front loop on the side nearest and through the corresponding back loop on the opposite side. Repeat 2-3 times in the same loops to give strength to the seam. Secure the stitch – I made a couple little knots over one of the loops nearest the seam created by the stitch.
If you used the same yarn for the body, secure the stitch as above and carry on to the next step.
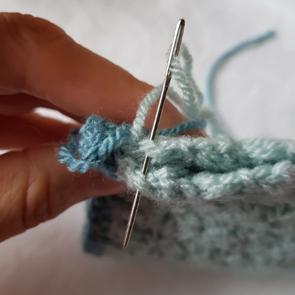
For the body – just like with the trim – sew through the front loop on the side nearest and the corresponding back loop on the opposite side until you reach the first stitch marker. It can be a bit tricky identifying these stitches – just do the best you can.
At the first set of stitch markers, try on the glove to check the positioning of the thumb opening. If the glove covers too much or not enough of your fingers, adjust as necessary. Remember to adjust your 2nd set of stitch markers at the bottom of the opening if you’re adding or removing stitches at the top. Double check your alignment. Once you’re happy, secure the seam at the top of the thumb opening.
Run the yarn through the backs of the crochet stitches alongside the thumb opening to the second stitch marker. For me, I was working the near side of the glove. Take care not to stitch through to the right side of the work.
At the 2nd set of stitch markers, give the work a bit of a stretch to relax this long running stitch. Check the thumb opening one more time, adjusting the positioning of the first stitch at the bottom of the opening as necessary. For reference…my thumb openings were 5cm/2”. Larger hands may need larger openings and vice-versa. Insert the needle through the front loop on the near side and corresponding back loop on the opposite side – again you’ll want to stitch through the loops 2-3 times for strength. Thumb opening done.
Check your alignment one more time and continue stitching until you get to the cuff. Hard part done!
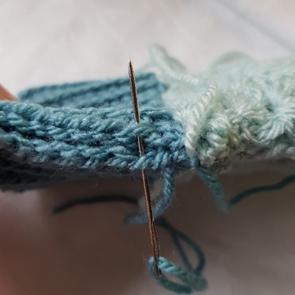
If you’re using the same colour throughout, check your alignment – The bottom and top edges of the cuff should align nearly perfectly. Sew the cuff seam using the same method as sewing the body – front loop of near side to corresponding back loop on the opposite side. Fasten off and weave in all ends.
Contrasting Cuff: check your alignment. The bottom and top edges of the cuff should align nearly perfectly. Fasten off colour B and pick up colour A. Sew the cuff seam using the same method as sewing the body – front loop of near side to corresponding back loop on the opposite side. Fasten off and weave in all ends.
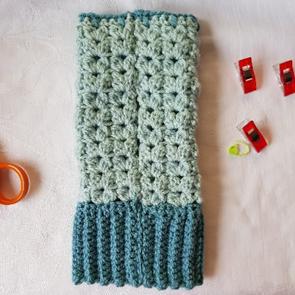
Turn your glove right side out and it is finished!
Marking up the thumb openings for the second glove is super easy…just align the second glove with the first glove. Find the top and bottom stitches on the first glove and insert your stitch markers in the same places on the 2nd glove. I find the lines created by the stitches really helps with inserting the markers in the correct spots.
I hope you enjoyed crocheting your half mitts and found the pattern easy to follow. If there any questions, I endeavour to answer all queries as quickly as possible, generally within 24 hours. I would love to see your finished projects…if you would post your images to Ravelry, Facebook, Instagram or Twitter with #fizzyhalfmitt that would be awesome! My handle for all if you want to tag me is @FizzyPetal.

Comments are closed, but trackbacks and pingbacks are open.